How to Grow Peppers in Containers. Everything That Worked and Everything That Did Not.
This post contains affiliate links. If you buy through them I earn a small commission at no extra cost to you. I only recommend products I would use myself.

My first container pepper season ended in a small pile of stunted plants and three peppers.
Not three per plant. Three total.
I had done everything right on paper. Full sun spot on my balcony. Regular watering. A liquid feed every two weeks starting from planting. The plants looked healthy. They flowered. And then almost nothing happened.
What I got wrong was temperature timing. I planted in mid-April when nights were still dropping to 50°F and the soil in my pots was cold. Pepper roots in cold soil are essentially switched off. The plants sat there barely growing while I fed and watered them faithfully. By the time temperatures consistently warmed up the plants had lost six weeks of productive growing time and never fully recovered.
The following season I waited until late May, used dark colored containers to warm the soil faster, and fed with the right fertilizer at the right time. Same varieties. Same spot. Dozens of peppers per plant through summer.
This guide covers what actually makes the difference in container pepper growing.
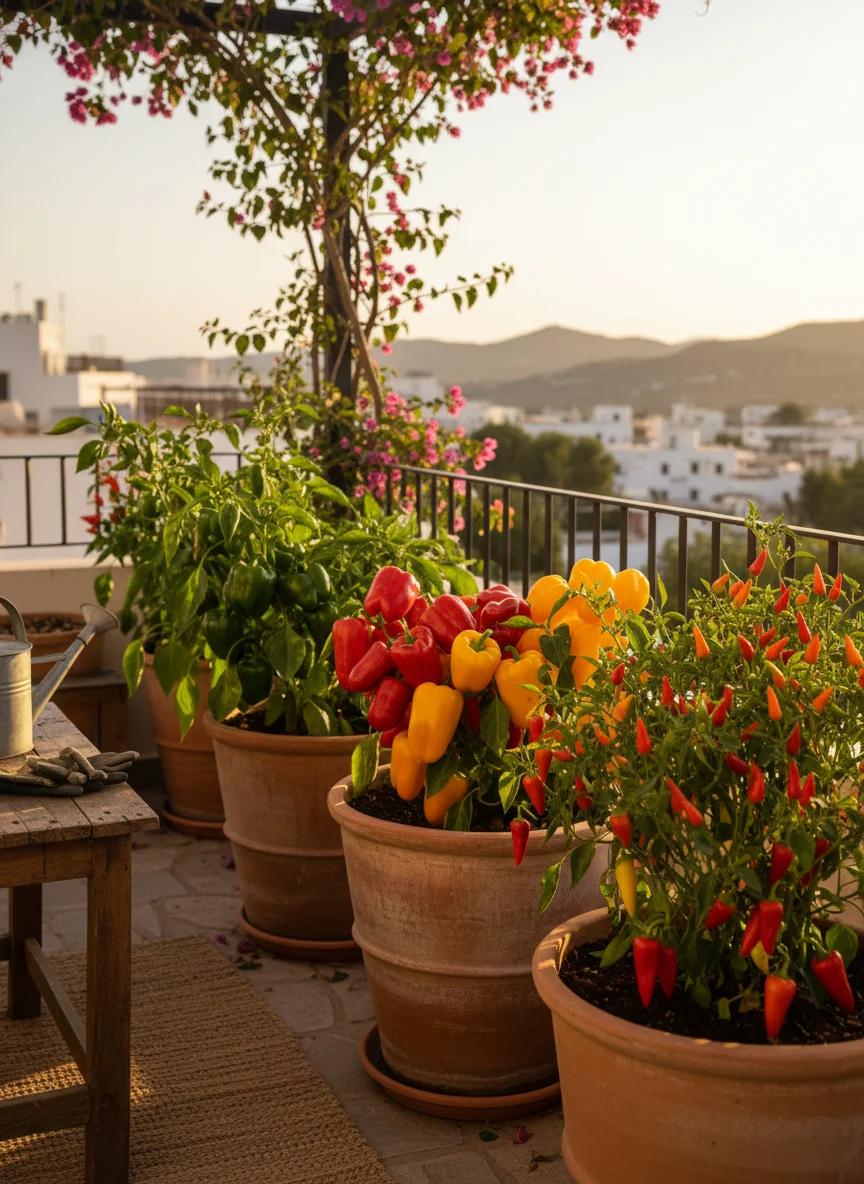
Why Peppers Are One of the Best Vegetables for Containers
Peppers suit containers better than most people expect.
They stay relatively compact compared to tomatoes and cucumbers. They do not require extensive staking or trellising for most varieties. They produce for months rather than weeks. They tolerate the heat that builds up in containers on south-facing balconies, which many vegetables dislike. And they come in an enormous range of varieties from sweet snacking peppers to fiery habaneros, all of which adapt well to pot growing.
The control that containers give you over soil quality is particularly valuable for peppers. Garden soil is often too heavy and poorly draining for peppers in the ground. In a container you fill with exactly the mix you want, root development is consistently better than what most garden beds provide.
The challenge is that peppers are more sensitive to cold temperatures than most beginner guides suggest. Get the timing and temperature right and they reward you generously. Rush them into cold conditions and they sulk for the entire season.
Choosing Your Pepper Variety
The variety you choose affects the container size you need, the care you provide, and how much fruit you realistically harvest. Knowing the difference between pepper types before you buy saves a lot of frustration.

Sweet bell peppers produce the large, thick-walled peppers most people associate with supermarkets. They are the most demanding container peppers. They need the largest pots, the longest growing season, and the most consistent watering and feeding. In a 5-gallon container with ideal conditions they produce 4 to 8 peppers per plant. In a 3-gallon container they produce disappointingly little. Bell peppers are worth growing in containers but they require more attention than other types.
Sweet snacking and mini peppers are among the most productive container peppers available. Varieties like Sweet Banana, Cubanelle, and mini sweet peppers stay compact, produce prolifically, and handle the temperature variation in containers better than large bell peppers. These are the best starting point for anyone new to container pepper growing.
Jalapeños are consistent performers in containers and one of the most commonly recommended varieties for pot growing. They stay manageable in size, produce heavily, and are robust enough to handle minor care inconsistencies. A well-grown jalapeño in a 5-gallon pot can produce more peppers than most households can use.
Hot peppers including cayenne, habanero, and chilli varieties are surprisingly well-suited to containers. Their compact growth habit, tolerance for heat and dry conditions, and high yield relative to plant size make them natural container crops. Thai hot, Bird’s Eye chilli, and cayenne varieties all perform excellently in 5-gallon pots and continue producing into fall.
Compact and patio varieties bred specifically for container growing are worth seeking out. Look for any variety described as compact, dwarf, or patio in the seed catalog description. These have been developed to produce well in limited root space and consistently outperform standard varieties in small containers.
Container Size Guide
Getting container size right is the second most important decision after variety selection.
Sweet bell peppers: 5-gallon minimum, 7 to 10 gallons recommended. Bells have deep roots and need the volume.
Standard sweet peppers and banana peppers: 3 to 5 gallons. These are less demanding than bells and perform well in moderately sized containers.
Jalapeños and mid-sized hot peppers: 3 to 5 gallons. A 5-gallon container produces noticeably better results than a 3-gallon for the same variety.
Compact hot peppers and chilli varieties: 2 to 5 gallons. Small hot pepper varieties like Thai hot and Bird’s Eye are genuinely compact and produce well in smaller containers.
Depth matters as much as volume. Peppers have long roots and need containers at least 12 inches deep. For bell peppers and larger varieties, 14 to 16 inches of depth produces stronger root development and better fruit production.
Dark-colored containers warm up faster in spring sunshine and hold heat longer into cool evenings. This advantage is significant early in the season when getting soil temperature up to the threshold peppers need. Dark fabric grow bags in appropriate sizes combine the heat retention benefit with the drainage and air-pruning advantages of fabric over plastic.
The Temperature Rule That Changes Everything
More container pepper failures come from ignoring this than from any other cause.
Peppers need warm soil to thrive. Their roots essentially stop functioning efficiently when soil temperatures drop below 60°F. Planting into cold containers in April because the calendar says spring has arrived produces the stunted, barely-growing plants that frustrate beginners into thinking they cannot grow peppers.
Wait until nighttime temperatures are consistently above 60°F and daytime temperatures are in the 70s before moving pepper plants outside. In most US growing zones this means late May to early June for outdoor container placement, not the mid-April date that many guides suggest.
If you start peppers from seed indoors in late February or March, harden them off gradually by placing them outside for increasing periods each day over two weeks before leaving them outside permanently. Sudden exposure to outdoor conditions after weeks indoors stresses plants regardless of temperature.
The payoff for patience is plants that establish quickly and grow vigorously rather than sitting in cold soil losing weeks of productive time.
Soil and Potting Mix
Never use garden soil in containers for peppers.
Garden soil compacts in pots, drains poorly, heats up unevenly, and often carries disease organisms that thrive in the closed container environment. A quality vegetable potting mix is the starting point.
To improve on a standard potting mix, add 20 percent perlite by volume. Perlite improves drainage and aeration, creates air pockets that pepper roots appreciate, and prevents the compaction that standard potting mix develops over a long growing season.
Peppers prefer a slightly acidic to neutral soil pH between 5.5 and 7.0. Most quality potting mixes fall within this range without adjustment.
Before planting, mix a slow-release granular fertilizer into the soil according to the directions for your container size. This provides baseline nutrition for the first 4 to 6 weeks without requiring immediate liquid feeding.
Planting
Plant one pepper per container regardless of pot size. Two plants competing for the same root space produce less combined fruit than two plants each in their own appropriately sized container.
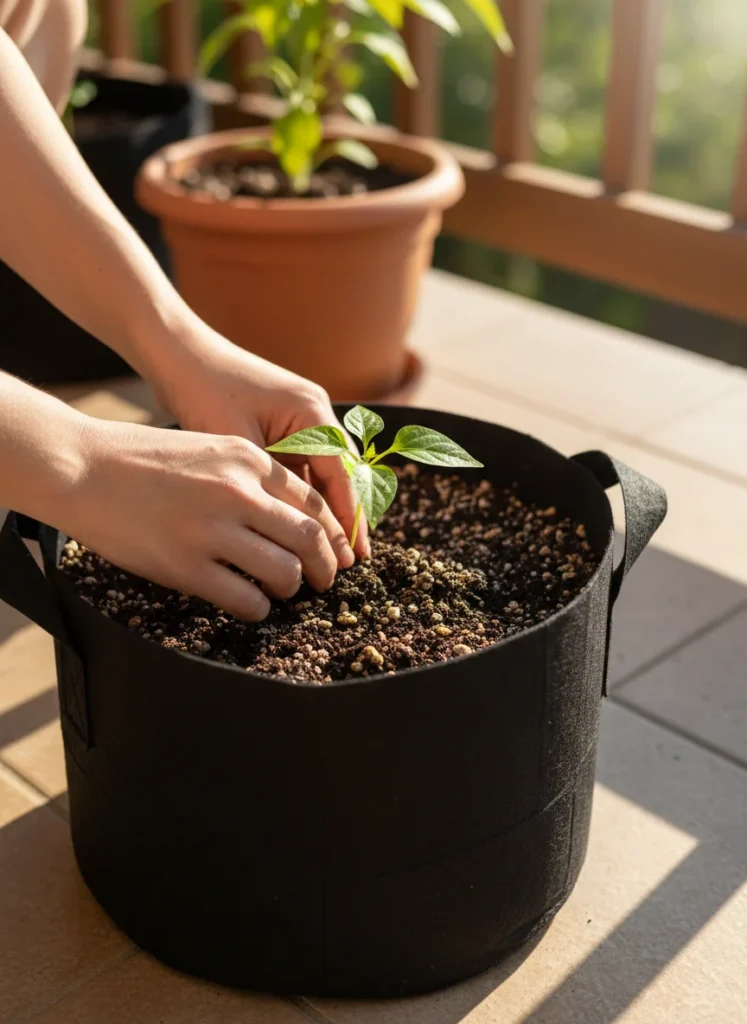
Plant at the same depth as the nursery pot or seed-starting container. Burying the stem deeper than it was previously growing does not benefit peppers the way it benefits tomatoes, which develop additional roots along buried stem sections.
Water thoroughly after planting. Keep the container out of full midday sun for the first two to three days to let the plant adjust before exposing it to maximum heat and light.
If planting from seed indoors, start seeds 8 to 10 weeks before your planned outdoor planting date. Peppers are slow germinators compared to tomatoes. They need consistent warmth of 75 to 85°F to germinate reliably and take 2 to 3 weeks. A seedling heat mat under the germination tray dramatically improves germination rate and speed.
Watering
Peppers need consistent moisture without ever sitting in wet soil.
In moderate weather, check containers every day or two and water when the top inch of soil is dry. In hot summer weather with containers in full sun, daily watering is typically necessary. When temperatures exceed 80°F consistently, twice-daily watering may be needed for containers in full sun.
The consequence of inconsistent watering is blossom drop and misshapen fruit. Peppers that experience alternating drought and flood stress drop flowers before they set fruit and produce peppers with uneven development if they do set fruit.
Water at the base of the plant rather than overhead. Wet foliage encourages fungal disease. A watering can with a long spout that directs water to the soil rather than the leaves is the most practical tool for container peppers.
A self-watering container with a built-in reservoir significantly reduces watering demands and produces more consistent moisture levels than manual watering. For anyone growing peppers on a high-rise balcony or with a busy schedule, the investment in self-watering containers pays for itself in improved yields and reduced plant losses.
Self-watering planter for vegetables, view price on Amazon.
Fertilizing: The Stage-by-Stage Approach
Peppers are heavy feeders but they need different nutrients at different growth stages. Fertilizing the same way throughout the season is one of the most common mistakes container pepper growers make.
Establishment phase (weeks 1 to 4): The slow-release fertilizer mixed into the soil at planting handles this period. No additional feeding needed.
Vegetative growth phase: Once the plant has established and is actively growing new leaves and stems, a balanced liquid fertilizer every two weeks supports healthy development. Look for a balanced NPK ratio such as 10-10-10 or similar.
Flowering and fruiting phase: This is where most growers go wrong. Switching to a high-potassium, lower-nitrogen fertilizer when flowers appear is critical. High nitrogen at this stage pushes lush leafy growth at the expense of flower production and fruit set. A fertilizer with an NPK ratio where potassium is the highest number is what you want for this stage.
A tomato fertilizer works well for peppers at the fruiting stage because the nutrient requirements of both plants align during fruit production.
Supporting Your Plants
Most hot pepper and snacking pepper varieties are compact enough not to need support. Bell peppers and larger sweet peppers benefit from a stake once they start carrying fruit, as the weight of developing peppers can cause stems to bend or break.
Place a single bamboo stake near the plant at planting time and loosely tie the main stem to it as the plant grows. Secure the ties loosely enough that they do not cut into the stem as it thickens. The goal is guidance and support, not compression.
A tomato cage works well for bushier varieties that branch from early on. Place it at planting for the same reason you stake at planting: to avoid root disturbance later.
Pollination
Peppers are self-pollinating, which means each flower contains both male and female parts and can set fruit without a visit from bees. This makes them more reliable producers on high-rise balconies where pollinators rarely visit than cucumbers or squash.
That said, some gentle movement of the flowers by wind or by lightly shaking the plant when flowers are open improves fruit set by distributing pollen within each flower. If you notice flowers dropping without setting fruit and you are sure watering and temperature are adequate, try gently shaking the plant when flowers are fully open.
Common Problems and Solutions
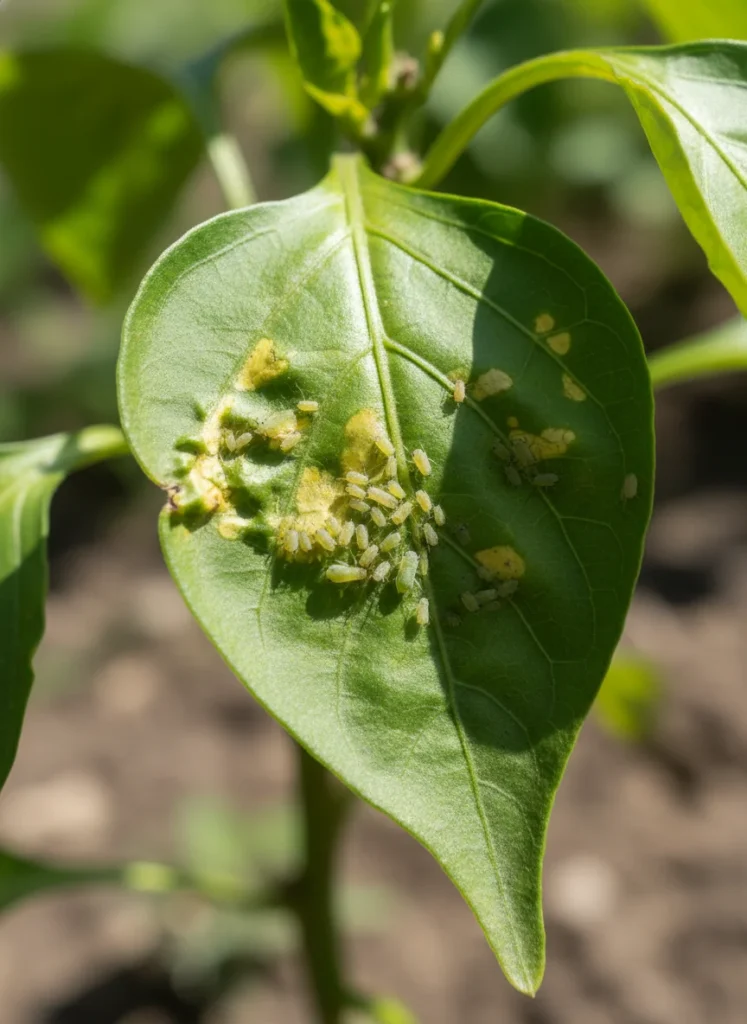
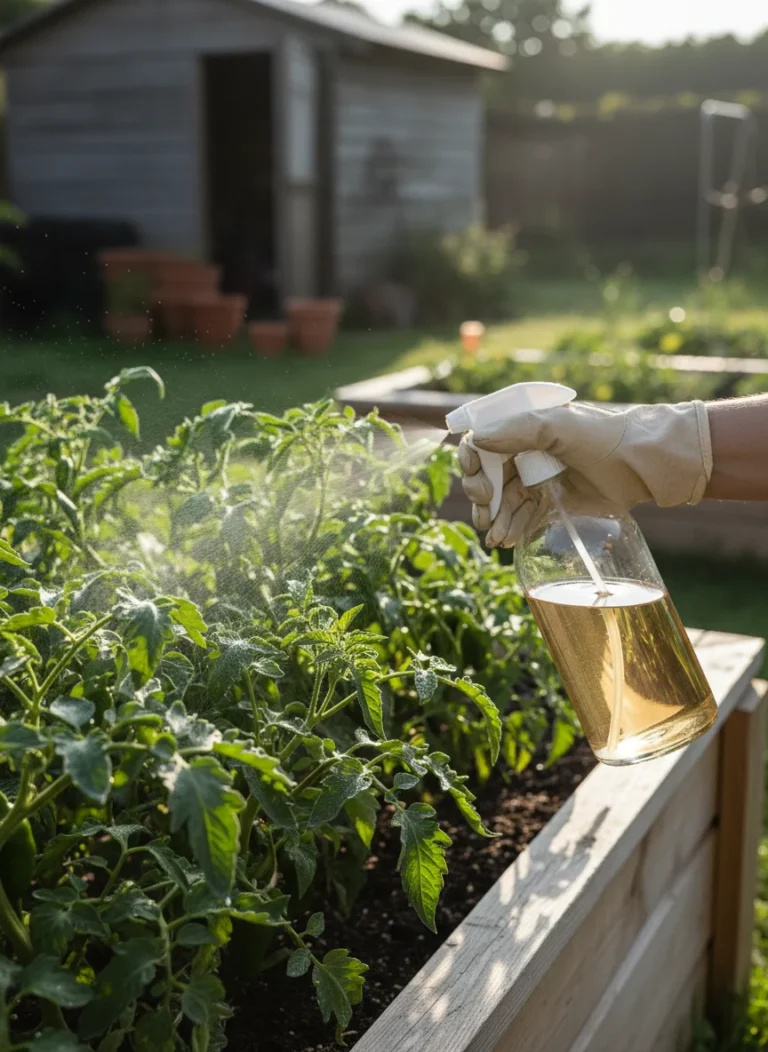
Aphids are the most common pest on container peppers. They cluster on new growth and the undersides of leaves, extracting sap and causing leaves to curl and yellow. A strong stream of water directed at infested areas removes most of them physically. Neem oil spray applied to both leaf surfaces manages persistent infestations. Healthy, well-fed plants recover from minor aphid pressure without intervention.
Blossom drop means flowers are falling off before setting fruit. The most common causes are temperature extremes, inconsistent watering, or too much nitrogen fertilizer. Address each one systematically. If nighttime temperatures are dropping below 60°F bring containers inside overnight. Ensure watering is consistent. Switch to a lower-nitrogen fertilizer if you have been feeding heavily.
No fruit setting despite flowers: Check that you are not in a period of extreme heat. Peppers stop setting fruit when daytime temperatures consistently exceed 90°F. This is a temporary condition. Production resumes when temperatures moderate. Gently shaking the plant when flowers are open also helps with fruit set.
Yellowing leaves: Lower leaves yellowing as the plant matures is normal. If yellowing spreads through the plant, check for nutrient deficiency and apply a balanced liquid feed. Yellowing combined with stunted growth in cold weather means the plant is too cold and needs to be moved to a warmer position.
Sunscald: White or tan patches on fruit that receive direct intense sunlight. Provide some afternoon shade during the hottest summer weeks or move containers to a position with morning sun and afternoon shade.
Harvesting
Most peppers can be harvested at any stage once they reach full size for the variety. Green bell peppers are unripe fruit. Leaving them on the plant until they turn red, orange, or yellow develops sweetness but reduces overall yield because a pepper ripening on the plant prevents new peppers from forming in its place.
For maximum yield, harvest bell peppers at full green size and let a few ripen to color for eating fresh or for seeds. For hot peppers and chillies, harvest regularly once they reach full size. The more you harvest, the more the plant produces.
Use scissors or a sharp knife to cut peppers from the plant rather than pulling. Pulling risks breaking branches or dislodging the plant in its container.
Most peppers are ready to harvest 60 to 90 days after transplanting outdoors. Container plants sometimes take slightly longer early in the season as they establish, particularly if planted during a cool spell.
Overwintering Container Peppers
This is one of the genuine advantages of growing peppers in containers that most guides ignore.
Peppers are perennial plants in their native tropical environments. They die in temperate winters only because they cannot survive frost outdoors. A pepper plant brought indoors before the first frost, placed in a bright window or under grow lights, and kept alive through winter will produce a second season the following year with significantly more vigor than a first-year plant.
Before bringing plants inside, spray with insecticidal soap to avoid introducing pests to your home. Cut the plant back by about half to reduce its size and encourage fresh growth in spring. Reduce watering significantly during winter when the plant is dormant but do not let it dry out completely.
A two-year-old pepper plant in a container starts the season with an established root system and branches that first-year plants spend weeks developing. The difference in early season production is notable.
Frequently Asked Questions
How many peppers will one container plant produce? This varies significantly by variety and growing conditions. A well-grown jalapeño or hot pepper in a 5-gallon container typically produces 20 to 50 peppers per plant through the season. Bell peppers in optimal conditions produce 5 to 10 full-sized peppers per plant. Sweet snacking varieties can exceed 30 peppers per plant under ideal conditions.
Can peppers grow in partial shade? Peppers need at least 6 hours of direct sun daily for reliable fruit production. In less than 6 hours they grow but produce significantly less fruit. If your balcony receives partial shade, sweet snacking peppers and jalapeños tolerate lower light levels better than bell peppers.
Do I need to pollinate container peppers by hand? Usually not. Peppers are self-pollinating and set fruit without bees. On completely enclosed balconies with no air movement, gently shaking the plant when flowers are open helps distribute pollen. Hand pollination with a small brush is an option but rarely necessary.
Can I grow peppers and tomatoes in the same container? Not recommended. Both are heavy feeders with large root systems that compete aggressively. Each plant produces better in its own appropriately sized container than sharing space with a competitor.
How do I know when my peppers are ready to harvest? Peppers reach their mature size before they change color. A full-sized green bell pepper is ready to eat. If you want red, orange, or yellow color you need to leave it on the plant until it ripens. For hot peppers, harvest once they reach full size for the variety. Color change in hot peppers usually increases heat level.
Why are my pepper plants tall and leggy? Leggy growth means insufficient light. Move containers to a sunnier position. If you are starting seeds indoors, move them under grow lights or to your brightest window as soon as they germinate to prevent the stretched growth that happens when seedlings reach for inadequate light.
Can I save seeds from container peppers? Yes. Scoop seeds from a fully ripe pepper and rinse off the flesh. Spread them on a paper towel and let them dry fully for one to two weeks before storing in a cool, dry location. Seeds from open-pollinated or heirloom varieties will grow true to the parent plant. Seeds from hybrid varieties may not.