
Why Are My Tomato Leaves Turning Yellow? The Honest Diagnosis for Container Gardeners.
This post contains affiliate links. If you buy through them I earn a small commission at no extra cost to you. I only recommend products I would use myself.
Yellow leaves on a tomato plant are one of those symptoms that looks urgent and feels alarming but usually has a completely fixable cause.
The problem is that at least a dozen different things cause tomato leaves to turn yellow and most gardening guides list them all without helping you figure out which one you are actually dealing with. You end up reading through a long list of possibilities and finishing more confused than when you started.
This guide works differently. It is written specifically for container tomato growers because the causes and fixes in containers are different from garden-grown tomatoes. It starts with the most likely cause and works outward. By the time you finish reading you will know exactly what is wrong with your plant and exactly what to do about it.
Before you read anything else, look at your plant and answer this one question.
Are the yellow leaves at the bottom of the plant or spread throughout the entire plant?
That single observation eliminates half the possibilities immediately.
Yellow leaves at the bottom only: Almost always normal aging, overwatering, or early fungal disease. Usually not serious if caught early.
Yellow leaves throughout the plant or on new growth: More likely a nutrient deficiency, disease, or pest issue that needs attention quickly.
Keep that observation in mind as you work through each diagnosis below.
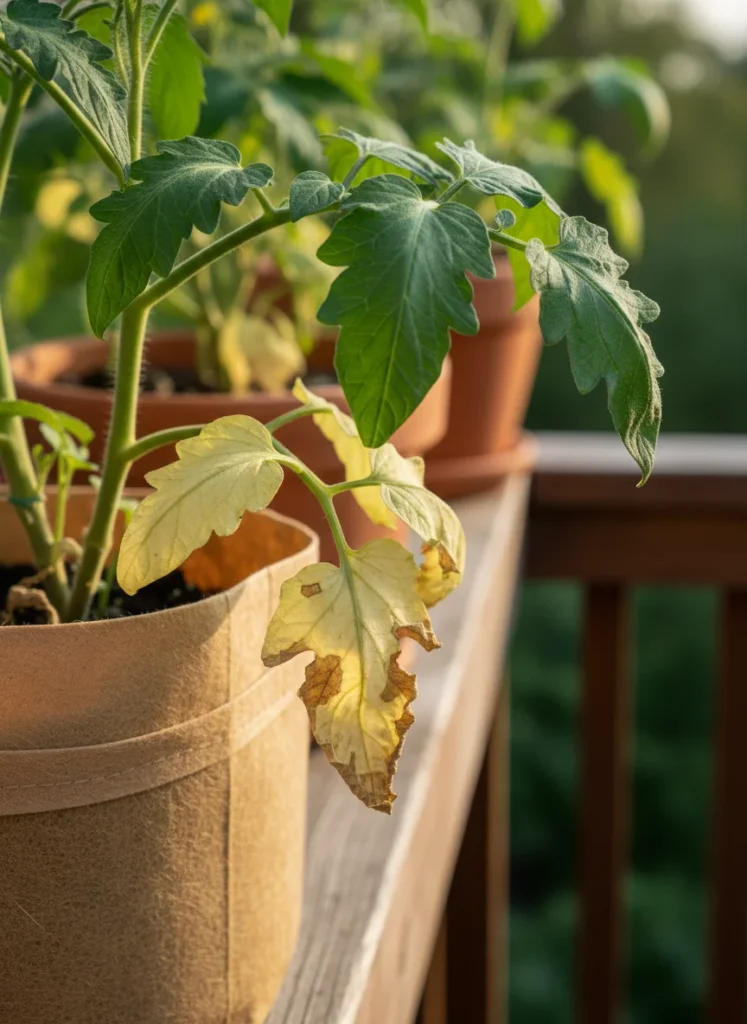
Diagnosis 1: Normal Aging
What it looks like: The lowest leaves on the plant, closest to the soil, turn yellow and eventually drop off. The rest of the plant looks healthy. New growth at the top is green and vigorous. No spots, no patterns, just pale yellow on the oldest lowest leaves.
Why it happens: Tomato plants naturally redirect energy away from older lower leaves as the plant grows taller and the canopy above creates shade at the base. The bottom leaves become unproductive and the plant drops them. This is not a problem. It is the plant being efficient.
What to do: Nothing, or remove the yellowing lower leaves with clean scissors to improve air circulation at the base of the plant. Removing these leaves also reduces the risk of soil-borne fungal spores splashing onto leaves during watering.
The container-specific angle: In containers, removing lower leaves is even more beneficial than in garden beds because airflow around container plants is often more restricted. Keeping the lowest 6 to 8 inches of stem clear of leaves improves the growing environment significantly.
Diagnosis 2: Overwatering
What it looks like: Yellow leaves that feel soft and slightly limp. The soil in the container feels wet or soggy. You may notice the container sitting in standing water in its saucer. The yellowing often starts with lower leaves but can spread if the problem continues.
Why it happens: Waterlogged soil suffocates roots by displacing the oxygen they need to function. Roots in wet, oxygen-depleted soil cannot absorb nutrients efficiently even when nutrients are present in the soil. The result looks like nutrient deficiency but the actual cause is drowning roots.
This is the most common cause of yellow container tomato leaves and the one most gardeners discover after assuming they need to feed their plant more.
What to do: Stop watering immediately and let the container dry out until the top two inches of soil are dry before watering again. If the container has no drainage holes or has become blocked, address that immediately. Empty the saucer if it is holding water. In severe cases where the plant has been sitting in wet soil for an extended period, the roots may have begun to rot. If the plant does not recover after the soil dries out, remove it from the container, inspect the roots, and trim away any soft brown or black rotted root sections before repotting into fresh dry potting mix.
Prevention: Always check the soil with your finger before watering. Water when the top inch is dry, not on a fixed schedule regardless of conditions.
Diagnosis 3: Underwatering
What it looks like: Yellow leaves combined with wilting or drooping, especially during the hottest part of the day. The soil in the container is very dry and pulling away from the sides of the pot. Leaves may have a slightly crispy or papery texture at the edges. In containers, the soil visibly shrinks away from the container walls when completely dry.
Why it happens: Without enough water, tomato plants cannot transport nutrients from soil to leaves. The leaves starve and yellow as a result. Container tomatoes are significantly more vulnerable to underwatering than garden-grown plants because the limited soil volume dries out much faster. A container in full summer sun can go from adequately moist to bone dry in a single hot afternoon.
What to do: Water deeply and immediately until water runs freely from the drainage holes. If the soil has become so dry that it is hydrophobic and water runs straight through without absorbing, place the entire container in a bucket or tub of water for 30 minutes to allow the soil to rehydrate from the bottom up. After this rehydration treatment, resume regular top-down watering and increase checking frequency to daily during hot weather.
Prevention: Check containers daily during summer. Feel the soil. Water when the top inch is dry. In extreme heat, large containers may need watering twice daily.
![Side by side comparison of two identical tomato plants in containers. Left plant is wilting with yellow leaves from underwatering, dry soil visible pulling from container edges. Right plant is healthy and green with moist dark soil. Clear contrast. Outdoor natural light. Photorealistic.]](https://barksecret.com/wp-content/uploads/2026/03/pressphoto-optimized-1773573302285-747x1024.webp)
Diagnosis 4: Nitrogen Deficiency
What it looks like: Uniform pale yellowing that starts with the oldest lower leaves and progressively moves up the plant. The yellowing is even across the whole leaf rather than patchy or spotted. New growth at the top of the plant is lighter green than normal. The plant may also appear generally pale and less vigorous than expected.
Why it happens: Nitrogen is the nutrient most responsible for green leafy growth. When a tomato plant runs short of nitrogen, it pulls nitrogen from older leaves to support new growth at the top. The older leaves yellow and the plant looks progressively washed out from the bottom up.
In containers, nitrogen deficiency happens for two main reasons. Either the initial potting mix did not contain enough nitrogen to begin with, or the plant has used up the available nitrogen in the limited soil volume and needs supplemental feeding. Container tomatoes exhaust soil nutrients faster than garden-grown plants because the root system cannot extend beyond the container to access additional nutrients.
What to do: Apply a balanced liquid fertilizer immediately. A nitrogen-rich fertilizer or a balanced 10-10-10 product will show results within 7 to 10 days as new growth emerges green and healthy. Going forward, feed container tomatoes with a balanced liquid fertilizer every 10 to 14 days throughout the growing season. Once the plant starts flowering, switch to a lower-nitrogen, higher-potassium formulation to support fruit production rather than leafy growth.
Balanced liquid tomato fertilizer, view price on Amazon.
Diagnosis 5: Magnesium Deficiency
What it looks like: Yellow patches between the veins of leaves, particularly on older lower leaves. The veins themselves remain green while the tissue between them turns yellow. This interveinal yellowing pattern is the key identifier that separates magnesium deficiency from nitrogen deficiency, which causes uniform yellowing across the whole leaf.
Why it happens: Magnesium is essential for chlorophyll production. Without adequate magnesium, the green pigment between leaf veins breaks down. In containers, magnesium can become depleted over time or become unavailable to the plant if the soil pH has shifted outside the ideal range. Overwatering can also leach magnesium from the soil faster than the plant can absorb it.
What to do: A diluted Epsom salt solution applied as a foliar spray or soil drench provides rapid magnesium supplementation. Dissolve one tablespoon of Epsom salt in one gallon of water and apply either as a foliar spray or water it directly into the soil. Repeat every two weeks until the interveinal yellowing stops progressing.
Note that Epsom salt should only be used when magnesium deficiency is the confirmed cause. Using it as a general tonic without a confirmed deficiency can raise soil magnesium levels to a point where they interfere with calcium uptake, creating a new problem.
Diagnosis 6: Overfeeding and Fertilizer Burn
What it looks like: Leaf edges and tips turning brown or yellow, almost as if scorched. The yellowing starts at the margins rather than in the center of the leaf. In severe cases you may see white crusty salt deposits on the soil surface or on the inside rim of the container.
Why it happens: Too much fertilizer, applied too frequently or in too high a concentration, creates excess salts in the container soil that damage roots and prevent water uptake. The plant essentially becomes unable to hydrate properly even when the soil is moist. This is more common in containers than in garden beds because the limited soil volume concentrates salts rather than dispersing them.
What to do: Water the container deeply and thoroughly several times in succession to flush excess salts through the drainage holes. Allow water to run freely from the bottom of the container for several minutes to ensure thorough flushing. Reduce feeding frequency or concentration going forward. If you have been applying fertilizer more frequently than every two weeks, pull back to fortnightly applications at the recommended rate.
Diagnosis 7: Early Blight
What it looks like: Dark brown or black spots on leaves, often with a target-like pattern of concentric rings. The spots are surrounded by a yellow halo. The disease starts on older lower leaves and moves up the plant progressively. Affected leaves eventually turn entirely yellow and drop. The pattern of starting at the bottom and moving upward is the key identifier.
Why it happens: Early blight is caused by a fungal pathogen that thrives in warm, humid conditions, particularly when foliage stays wet. It is spread by splashing water carrying spores from the soil surface onto lower leaves. In containers, consistent overhead watering that wets the foliage creates ideal conditions for early blight development.
What to do: Remove affected leaves immediately using clean scissors and dispose of them in the bin rather than composting. Fungal spores in compost spread to other plants. Apply a copper-based fungicide or neem oil spray to the remaining foliage, covering both the top and undersides of leaves. Water at the base of the plant going forward rather than overhead. Increase spacing between containers if possible to improve air circulation.
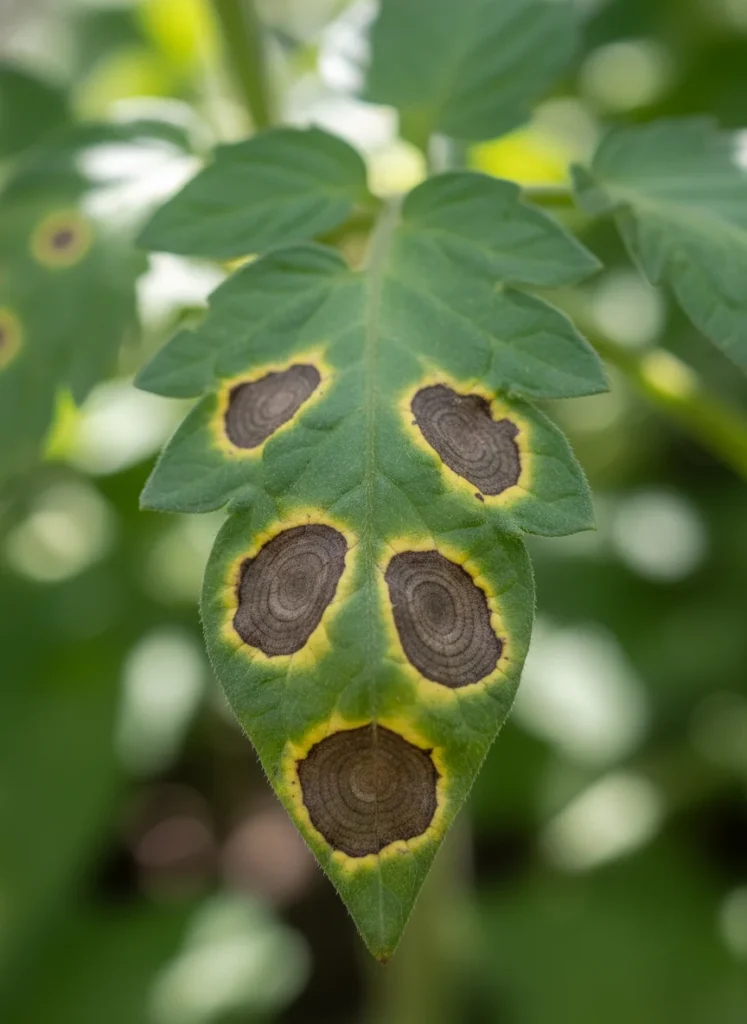
Prevention going forward involves removing lower leaves to prevent soil splash, watering at the base only, and spacing containers to allow adequate airflow between plants.
Diagnosis 8: Septoria Leaf Spot
What it looks like: Small circular spots with dark brown edges and pale gray or white centers, surrounded by yellow halos. The spots are smaller and more numerous than early blight, with less of the concentric ring pattern. Like early blight, it starts on lower older leaves and progresses upward.
Why it happens: Another fungal disease spread by water splash from soil to foliage. The conditions that encourage early blight encourage Septoria as well. The two diseases often appear together on the same plant.
What to do: Remove affected leaves immediately. Apply a copper-based fungicide or neem oil. Improve air circulation and switch to base-only watering. The treatment approach is identical to early blight management.
Diagnosis 9: Pest Damage
What it looks like: Yellow stippling or mottling on leaves, often accompanied by tiny insects visible on the undersides of leaves. Spider mite damage creates a distinctive fine bronzy stippling with visible webbing in severe infestations. Aphid damage causes distorted, curling, and yellowing new growth. Whitefly damage causes general yellowing with the insects visible as small white flying specks when the plant is disturbed.
Why it happens: Sap-sucking insects remove plant fluids and in doing so deplete the chlorophyll that gives leaves their green color. In containers, pest populations can build up faster than in garden beds because the isolated plant represents a concentrated food source.
How to check: Hold a sheet of white paper under a leaf and tap the leaf firmly. Any spider mites will fall onto the paper as tiny moving specks. Examine leaf undersides with a magnifying glass for aphid clusters and whitefly eggs.
What to do: For spider mites and aphids, a strong jet of water directed at the undersides of leaves removes most of the population physically. Repeat daily for several days. For persistent infestations, apply neem oil spray to both leaf surfaces. For whitefly, yellow sticky traps positioned near the plants catch adults and reduce population pressure.
Diagnosis 10: Root Bound Container
What it looks like: General yellowing and stunted growth despite adequate watering and feeding. The plant looks stressed and unwell without a clear single cause. The container may show roots growing from the drainage holes. When you lift the plant from the container the root ball holds the shape of the container and roots are circling the exterior.
Why it happens: When roots have filled the container completely there is no room for further development and the plant cannot absorb water or nutrients efficiently regardless of what you provide. Container tomatoes need adequate root space. A plant in a container that is too small for its root system will always underperform.
What to do: Repot into a larger container. For most standard tomato varieties this means moving to at least a 10-gallon container. For indeterminate varieties, 15 to 20 gallons. Use fresh potting mix. Water well after repotting and keep the plant in partial shade for a few days to reduce transplant stress. For full guidance on container sizing for tomatoes, read my guide on what size grow bag for tomatoes.
The Diagnostic Checklist
Work through this list in order when you find yellow leaves on your container tomato.
Step 1: Are the yellow leaves only at the bottom of the plant? If yes, check for normal aging first. Remove the leaves and monitor the plant for a week before concluding there is a problem.
Step 2: Feel the soil. Is it soggy and wet? Overwatering. Is it bone dry and pulling away from the container walls? Underwatering. Address whichever applies.
Step 3: When did you last feed the plant? If it has been more than three weeks and the yellowing is uniform across older leaves, suspect nitrogen deficiency and apply a balanced liquid feed.
Step 4: Is the yellowing between the veins while veins remain green? Magnesium deficiency. Apply Epsom salt solution.
Step 5: Are there spots with dark borders or pale centers? Look for early blight or Septoria patterns. Remove affected leaves and treat with copper fungicide.
Step 6: Are there tiny insects on the undersides of leaves or webbing? Pest issue. Treat with water jet and neem oil.
Step 7: Is the plant generally stunted and performing poorly despite good care? Check root bound condition and consider repotting into a larger container.
One Thing to Do Regardless of the Cause
Remove all yellow leaves as soon as they appear, regardless of the cause.
Yellow leaves are no longer photosynthesizing and are not contributing to the plant’s health. If they are diseased, leaving them on the plant allows spores to spread. Removing them promptly improves air circulation at the base, removes potential disease sources, and allows the plant to redirect any remaining resources toward healthy growth.
Use clean scissors rather than pulling to avoid damaging the stem. Dispose of removed leaves in the bin rather than composting if disease is suspected.
Frequently Asked Questions
Can yellow tomato leaves turn green again? Once a leaf has yellowed significantly it will not return to full green. The goal of diagnosis and treatment is to stop the yellowing from progressing to new leaves and to restore the health of the overall plant, not to rescue individual yellowed leaves. Remove yellow leaves and monitor new growth for improvement.
Should I remove all yellow leaves from my tomato plant? Yes, remove yellow and heavily affected leaves promptly. They are no longer productive, and if diseased they actively harm the plant by spreading spores. Healthy lower leaves that are slightly pale can be monitored rather than removed immediately.
How quickly should I see improvement after treating a nitrogen deficiency? New growth should emerge noticeably greener within 7 to 10 days after applying a nitrogen-containing fertilizer. Existing yellowed leaves will not recover but the spread of yellowing to new leaves should stop relatively quickly.
Is it normal for tomato leaves to turn yellow in summer heat? Mild yellowing of older lower leaves during the hottest summer weeks is normal and not cause for alarm. If yellowing is widespread, appearing on newer growth, or accompanied by spots or other symptoms, it indicates a problem beyond normal heat stress.
Can I prevent yellow leaves entirely? Not entirely. Some lower leaf yellowing as the plant matures is normal. But the main preventable causes include consistent watering, regular feeding every 10 to 14 days, watering at the base rather than overhead, removing lower leaves to prevent soil splash, and using an appropriately sized container. Address those five things and most yellow leaf problems will not occur.
My tomato plant has yellow leaves and I am not sure which cause applies. What should I do first? Water the plant correctly, wait three days, and then apply a balanced liquid fertilizer. This addresses the two most common causes simultaneously. If the plant does not improve within a week, work through the diagnostic checklist systematically.